CI – continuous integration – is a practice of automated implementation and distribution of the programmer’s work. CI has many advantages, and features, among which we would note the following:
- Unified codebase, into which developers branches are being merged – achieved using GitFlow
- Building automation – assembly starts automatically after new code is merged into master or develop branch using the pipeline in GitLab
- Testing automation – automatically starts testing as a stage in the pipeline
- Convenient access to build artifacts
- Automated deploy – an additional script can publish artifacts in application stores or along the distribution path.
CI, like any automation, eliminates the human factor and automates repetitive actions. Therefore, it is desirable to configure CI on any serious project. And in the case when there are several developers and releases happens frequently, CI must be configured necessarily.
Typically, CI configuration is the responsibility of the DevOps engineer. However, although most companies have such a person, he may not be available or may not be able to configure CI specifically for the Android project. That is why Android developers should be able to do this on their own. How do we do it? I will tell and show in this article.
Let’s begin.
From GitLab point of view, CI consists of:
- Jobs, which describes what to do. For example to build or to test the code
- Stages, which describes when to start the job
Usually there are the following stages:
– build job called compile
– test – starts tests
– staging – deploy on stage
– production – deploy on prod
All this information about jobs and stages we need to tell GitLab. We will do it using .gitlab-ci file, which we need to put in the root of Android project. It will describe all the steps, as well as execute the necessary scripts.
At first we need to specify the image, which will perform the job
image: openjdk:8-jdk
Next, in the before_script section we’ll write the scripts that the server must execute in order to configure the build environment.
before_script:
 - apt-get --quiet update --yes
 - apt-get --quiet install --yes wget tar unzip lib32stdc++6 lib32z1
 - wget --quiet --output-document=android-sdk.zip https://dl.google.com/android/repository/sdk-tools-linux-${ANDROID_SDK_TOOLS}.zip
 - unzip -d android-sdk-linux android-sdk.zip
 - echo y | android-sdk-linux/tools/bin/sdkmanager "platforms;android-${ANDROID_COMPILE_SDK}" >/dev/null
 - echo y | android-sdk-linux/tools/bin/sdkmanager "platform-tools" >/dev/null
 - echo y | android-sdk-linux/tools/bin/sdkmanager "build-tools;${ANDROID_BUILD_TOOLS}" >/dev/null
 - export ANDROID_HOME=$PWD/android-sdk-linux
 - export PATH=$PATH:$PWD/android-sdk-linux/platform-tools/
There is no magic here, and if you are familiar with unix systems and their commands, then you should understand everything: we just tell the system to download and install necessary packages.
Be sure to include the SDK version numbers that the server must install. To do this, add a variables block above before_script
variables:
 ANDROID_COMPILE_SDK: [version_number]
 ANDROID_BUILD_TOOLS: [version_number]
 ANDROID_SDK_TOOLS: [version_number]
Next, specify the types of assembly steps in the stages block
stages:
 - build
 - test
 - deploy
Now we are ready to complete the assembly itself.
I recommend to use two types of builds – release and debug. You can make as many options as you like based on your tasks.
At first specify debug build
buildDebug:
 stage: build
 tags: [android]
 only:
 - develop
 - master
 - /^release.*$/
 cache:
 paths:
 - .gradle/caches
 variables:
 VAR_NAME: BUILD_NUMBER // autoincrement build number
 TOKEN: ${CI_PIPELINE_IID_TOKEN}
The only tag allows to trigger assembly in case of pushing to a specific branch or by tag, as we will see later.
The BUILD_NUMBER variable will be read using a token CI_PIPELINE_IID_TOKEN from Variables preferences in the CI block in the GitLab. It allows us to add an autoincrement build number to the version name. This approach is described in more detail here. And below I will show how to configure build.gradle to generate the version name and build number. In the meantime, continue with .gitlab-ci
Next block is the script
script:
 # готовим переменную с номером сборки
 - GITLAB_URL=$(echo ${CI_PROJECT_URL} |awk -F "/" '{print $1 "//" $2$3}')
 - "VAR=$(curl -s -f --header \"PRIVATE-TOKEN: ${TOKEN}\" \"${GITLAB_URL}/api/v4/projects/${CI_PROJECT_ID}/variables/${VAR_NAME}\" | jq -r '.value' ) "
 - let VAR=VAR+1
 - "curl -s -f --request PUT --header \"PRIVATE-TOKEN: ${TOKEN}\" \"${GITLAB_URL}/api/v4/projects/${CI_PROJECT_ID}/variables/${VAR_NAME}\" --form \"value=${VAR}\" "
 # записываем переменную во временный файл, из которого будет считывать этот номер в build.gradle
 - echo $VAR > build.version
 - chmod +wx build.version
 - sed -i 's/android.enableBuildCache=false/android.enableBuildCache=true/g' gradle.properties
 # и собственно собираем сборку
 - ./gradlew clean app:assembleDebug
Now it remains only to specify how and where to store artifacts, i.e. apk::
artifacts:
 when: always
 expire_in: 4 weeks
 paths:
 - app/build/outputs/apk/
Вот и все, а для релизной сборки укажем такой же блок, но stage и него будет deploy, а сборка будет собираться еще и с app:assembleRelease, и собираться такая сборка будет только при создании тэга в GitLab.
That’s all, and for the release build we will specify the same whole block, but stage will be deploy, and the assembly will also be built with app:assembleRelease, and such assembly will be triggered only by tag in GitLab.
In addition, we need to configure automatic increment of build numbers.
To do so add next lines in build.gradle, which will generate versionCode and versionName based on the minimum version of the target api:
private Integer generateVersionCode() {
 def minSDK = rootProject.minSdkVersion * 1000000
 def major = rootProject.versionMajor * 10000
 def minor = rootProject.versionMinor * 100
 def patch = rootProject.versionPatch
 def versionCode = minSDK + major + minor + patch
 project.logger.debug('versonCode ', versionCode)
 return versionCode
 }

private String generateVersionName() {
 String versionName = "${rootProject.versionMajor}.${rootProject.versionMinor}.${rootProject.versionPatch}"
 versionName += '.' + getBuildNumberFromFile()
 return versionName
 }
Off course, in the root build.gradle you should have version numbers written in the form
 versionMajor = 1
 versionMinor = 0
 versionPatch = 0
 minSdkVersion = 23
Also add functions to get the build number from CI GitLab, and in the case of a local build – from git:
def getBuildNumberFromGit() {

try {
 def stdout = new ByteArrayOutputStream()
 exec {
 commandLine 'git', 'rev-list', '--all', '--count'
 standardOutput = stdout
 }
 return stdout.toString().trim()
 }
 catch (ignored) {
 return '?'
 }
}
// This method gets the build number from the special file that we generated above in the .gitlab-ci script
def getBuildNumberFromFile() {
File versionFile = file('../build.version')
 if (versionFile.exists()) {
   return versionFile.readLines().get(0).trim()
 } else {
   return getBuildNumberFromGit()
 }
}
It remains to call this method for the version name, as well as for the build number
defaultConfig {
 applicationId "ru.andreyaleev"
 minSdkVersion rootProject.minSdkVersion
 targetSdkVersion rootProject.targetSdkVersion
 versionName generateVersionName()
}

buildTypes {

applicationVariants.all { variant ->
 variant.outputs.each { output ->
   output.versionCodeOverride = generateVersionCode()
   output.outputFileName = "$setup.applicationId-${variant.versionName}.apk"
 }
 }
 ...
Done with the code, now you need to add the variable to GitLab, the idea is taken as described here
Go to Settings->CI/CD->Variables, and add BUILD_NUMBER and CI_PIPELIBE_ID_TOKEN
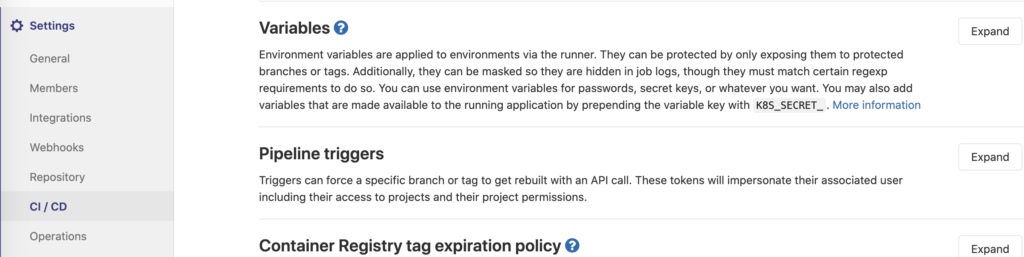
Set BUILD_NUMBER to 1, and into CI_PIPELIBE_ID_TOKEN put the value of the token that needs to be generated through the Access Tokens section of the profile
It remains to push the changes to GitLab, and it will automatically start Pipeline.
To create the release build that we configured above we need to create a Tag through Repository->Tags-> New Tag
Select the branch from which you want to create the assembly and run. All is ready!