Recently I was need to setup Android Studio IDE on a windows host with corporate proxy. Topic isn’t new and has been discussed on stackoverflow and in other blogs However, this problem can not be solved immediately – it takes a lot of time and a bit of blood. So I decided to write this post with step-by-step instruction on IDE setup for Android-developer in proxy environment.
We will use windows PC. For linux algorithm would be the same.
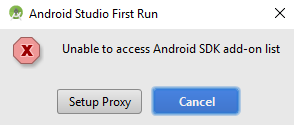
After first run Android Studio suggests to configure a proxy:

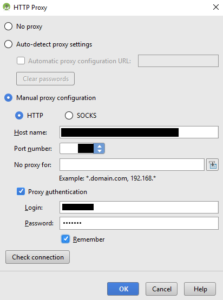
Click Setup Proxy and enter proxy server address and your credentials:

You can check out your proxy server address with ipconfig (windows)
ipconfig /all | find /i "Dns Suffix"
You may check connection on same window. If everything is OK, move next.
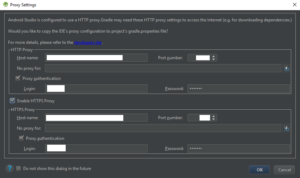
After IDE starts next window appears where you should write your proxy settings again for http and https:

Also, you can set configurations via gradle.properties file:
systemProp.http.proxyPassword=<PASSWORD>
systemProp.http.proxyHost=<PROXY_URL>
systemProp.http.proxyUser=<LOGIN>
systemProp.http.proxyPort=<PORT>
systemProp.https.proxyPassword=<PASSWORD>
systemProp.https.proxyHost=<PROXY_URL>
systemProp.https.proxyUser=<LOGIN>
systemProp.https.proxyPort=<PORT>
But keep in mind that IDE’s settings proxy overrides your projects settings.
If you try to compile project now, it will likely fail with error message
SSLHandshakeException: sun.security.validator.ValidatorException: PKIX fix
Gradle tries to get to repositories servers without certificates. We need to add them into cacerts storage.
But before we will add new lines in gradle.properties:
systemProp.javax.net.ssl.trustStore=<ANDROID STUDIO PATH>\\jre\\lib\\security\\cacerts
systemProp.javax.net.ssl.trustStorePassword=changeit
Here we set path to cacerts storeage file. Default password is changeit. If you didn’t changed it, leave it as it is.
So, how do you add certificates to cacerts?
Setting certificates
After first start IDE suggest to accept certificates. You should accept them, but it may not help. We need to import certificates by hands into cacerts storage of IDE and JVM. To do so perform next steps:
- Download certificate. You may use web-browser or openssl
- Import certificate via keytool
To import downloaded on step 1 certificate on Windows PC run as administrator cmd and type:
keytool -import -alias <alias> -keystore C:\Progra~1\Android\Android Studio3.0\jre\jre\lib\security\cacerts -file <path_to/certificate_file>
Also, add this certificate into other cacerts storages (JVM и Android Studio):
keytool -import -alias <alias> -keystore <path_to_studio>\.AndroidStudio3.0\system\tasks\cacerts -file <path_to/certificate_file>
 keytool -import -alias <alias> -keystore "C:\Progra~1\Java\jre_V.V.V\lib\security\cacerts" <path_to/certificate_file>
alternatively, instead of adding, we may just copy certificates from one storage to another with next command:
keytool -importkeystore -srckeystore <path_to_studio>\.AndroidStudio3.0\system\tasks\cacerts -destkeystore C:\Progra~1\Java\jre_V.V.V\lib\security\cacerts -v
 password changeit
After importing the certificates, clean the gradle cache in the C:\Users\<User>\.gradle folder and reboot the system.
Also, start Android Studio as administrator if you getting Access denied error when IDE tries to read cacerts file.
Build your project… Build successful!
If certificate import didn’t help, you can try to use regular http instead of https:
jcenter {
 url "http://jcenter.bintray.com/"
 }
Git
Besides gradle, you may face some problems with git also. To avoid 403 error change git global proxy settings. Run command:
git config --global http.proxy http[s]://userName:password@proxyaddress:port
And if you see next error when trying to pull/push from/into Git server
SSL certificate problem: self signed certificate in certificate chain
then run next command from administrator:
git config --system http.sslCAPath <path_to_studio>/.AndroidStudio<v.No>/system/tasks/cacerts
To be able to push/pull with Android Studio IDE’s Git also change Settings->Version Control->Git section SSH executable set Native

That’s all, we can work! Hope this article was useful for you. If you liked it, leave your comments below!